Monday, October 7, 2013

Print PRN File

Send PRN File to Printer

A PRN file is a type of file that can be read by printers. It’s basically a generic output file that printers can understand. Sometimes you will end up with one of these files and you will need to print it.
You used to be able to print these files to your local printer by using the command COPY /B C:\FILENAME.PRN LPT1:. These days, printers are not attached to LPT1 anymore. USB cables are used instead. So you have to use the network method in order to print the file. Here’s how to do this in Windows.
1. Share the printer on the network. If the printer you are using is already on a network such as your company network, skip this step.
2. Now we have to find the network path to your printer. If the printer you wish to print to is a company shared network printer that is not attached to your computer, it should have the server name and printer name under your list of Printers. It will say something like printername on serverp or LaserJet on printserver. So the path to these printers would be \\serverp\printername and \\printserver\LaserJet respectively.
If the printer is attached to your PC, the path will be the computer name and then the name of the printer. You can find your computer name by right-clicking My Computer and selecting Properties under the Computer Name tab. The name of the printer can be found under Printers in Windows by right clicking on the printer and selecting Properties. The printername is in the top field. So if my computer name is TP123 and the printer name is LaserJet, the path would be \\TP123\LaserJet.
3. Armed with this information, we can then go to Start > Run and use this command to copy the file to the printer. This command assumes the PRN file is located on the root of the C drive:
COPY /B C:\FILENAME.PRN \\TP123\LaserJet
The printer should then print out the contents of the PRN file.

Defragment op[tion in Windows 7

How to run file defragmentation in windows 7

In Windows 7, defrag is typically setup to run automatically at least once a week.  To run a manual defrag, or to change the schedule of disk defragmenter, click Start and type Disk Defragmenter, then hit Enter.  From here you can click Configure Schedule to change when the defrag runs, or just click Defragment Disk to run a manual defrag.

Slipstream Windows 7 SP1

Slipstream Windows 7 SP1

Installing Windows 7 can take a long time.  That’s why us techies have to slipstream a Windows 7 SP1 disc to make the process easier. This process will take your non-service pack Windows 7 installation disc and allow you to burn a new disc with SP1 merged. No more running Windows Update for hours after a Windows 7 installation.
1. Download the Windows 7 Service Pack 1 standalone EXE file.
  • windows6.1-KB976932-X64.exe for 64-bit
  • windows6.1-KB976932-X86.exe for 32-bit
2. Download and install the Windows Automated Installation Kit. The file Microsoft provides is an ISO image file. You will need to burn a disc with this file, then run the WAIK installer from the disc. (This step only required if you are performing these steps on a non-Windows 7 system)
3. Download and install RT Seven Lite. Be sure to grab the version with slipstreaming support.
4. Run RT Seven Lite.
5. On the Home tab, Click Browse and select Choose OS path.
6. Place your Windows 7 installation disc into your DVD drive and select the drive. The software will prompt you to copy the files to a location on your hard drive. In this example, I used F:\Win7. RT Seven Lite copied my entire Windows 7 installation disc to F:\Win7\GRMCPRXFREO_EN_DVD.
File location
7. When prompted, select the version of Windows 7 you’ll be working with. Check the Slipstream Service Pack box, then click OK.
Select version of Win7
8. Click the Browse button and select the EXE file you downloaded in step 1. Click Start and the service pack files will be merged with the installation disc files. This may take a long time. For me it took over an hour.
Service pack integrating process
9. Once its finished integrating, click Proceed.
Service Pack 1 integrated successfully
10. Click the Tasks tab on the left. Check the ISO Bootable box.
Note: It may take some time for it to respond when you click Tasks, but be patient. In my case, I had to click Tasks a few times before it displayed anything.
RT Seven Lite Tasks
11. Click the ISO Bootable tab at the bottom-left. This will present a screen to burn a CD. Place a burnable DVD in your drive and set Mode to Direct Burn, select a Burn speed, then click Direct Burn.
Note: The Burn speed failed to display a value for me at first. I had to eject then re-insert the burnable disc. I then had to change the Mode setting to something else before flipping it back to Direct Burn.
Disc burning settings
That’s it! You’re Windows 7 disc should now burn with SP1 slipstreamed. You can now boot from the disc and install Windows 7 without having to install Service Pack 1 separately. Click Finish to exit the software. Wait patiently as it cleans up files and closes.
Just to be sure, I tested the disc by installing Windows 7 on a VMWare virtual PC. It worked fine.
VMWare shows SP1
Please feel free to let me know of any changes or additions I should make to this post in the comments sections.

Printer and Remote Desktop Session

Printer Doesn’t Show In Remote Desktop Session

So you have a printer installed on your Windows computer, but the printer is not showing in your Remote Desktop session? There are a few things to check when you experience this issue.

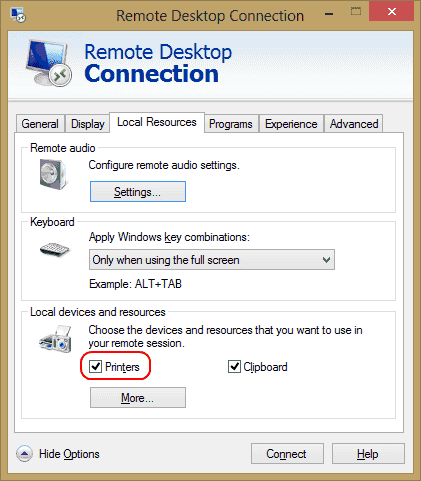
1. Ensure that you have the Printers option selected in your Remote Desktop settings. You can check this by bringing up the Remote Desktop Connection screen, selecting Local Resources and ensuring the Printers option is selected.
Printers setting in RDP

2. If you are connecting to a Windows Server box, ensure the settings on the server don’t disable the sharing of Printers. Check Start > Administrative Tools > Remote Desktop Services > Remote Desktop Session Host Configuration. Then select Connections, right-click the name of the connection > Properties > Client Settings > Redirection. Ensure that Windows Printer is not checked.
3. Check that the printer drivers are installed on the computer you are connecting to. If the drivers haven’t been installed, on the computer you are connecting to, the printer won’t appear at all.

Add Devices to the Windows Driver List

How to Add Devices to the Windows Driver List

Post image for How to Add Devices to the Windows Driver List 
Whenever you install a device in Windows, you might be prompted to choose which driver to use. You may notice that the list contains a select few devices, but it’s not complete. Pressing the Windows Update button may populate the list with more options, but some devices won’t ever show in this list. If you would like to add a device to the list of pre-installed drivers within Windows, it’s easy. Just follow these steps.
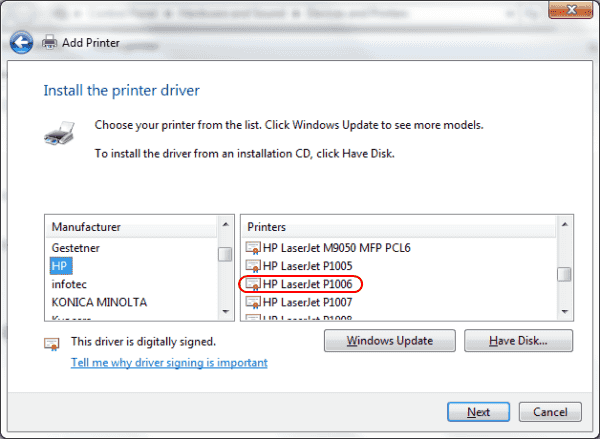
So let’s say that I install a lot of HP LaserJet P1006 printers and I want it to be on the list of drivers to choose from when installing it. Windows will not show the LaserJet P1006 by default. I will use the following steps to add this printer to the list of drivers in Windows.
1. Download the drivers.
2. Hold down the Windows Key and press R to bring up a run dialog box.
3. Type %SystemRoot%\Inf, then press Enter.
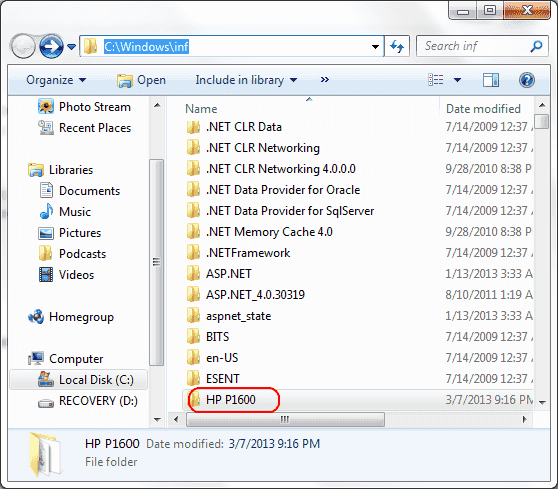
4. Within the Inf folder, create a new folder with the name of the device. In this case I made one called “HP P1006″.
Folder in INF directory
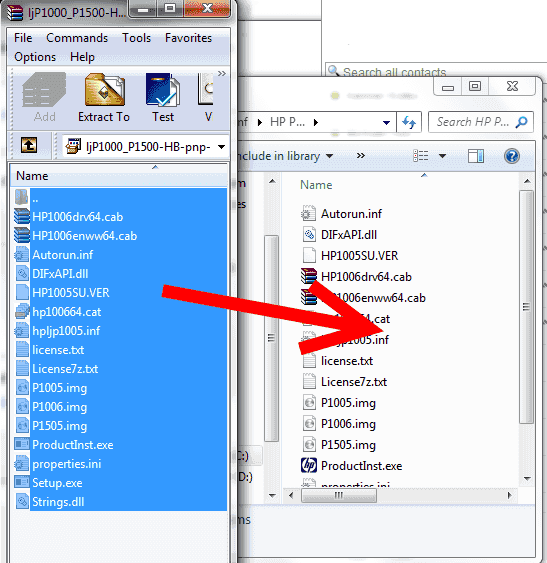
5. Put the driver files into the folder you created. In this case, my driver came as an EXE file. I had to use WinRAR to extract the files, then copied them from WinRAR to the C:\Windows\inf\HP P1600 folder.
Copy files from WinRAR
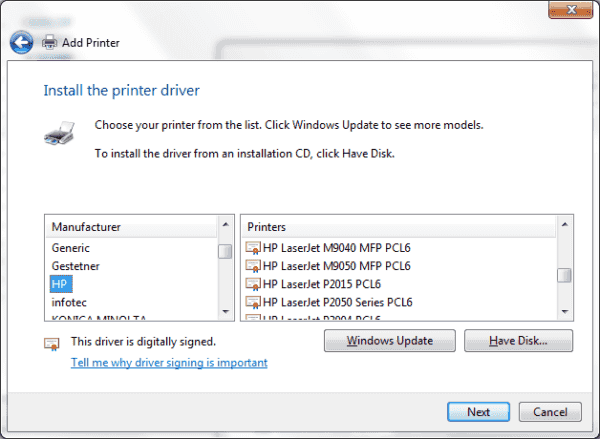
6. Now when going to add a printer, the driver shows in the pre-installed driver list within Windows. W00t!
Driver now listed

Note: This tutorial will only work with signed drivers. Non-signed drivers will not show in the list.

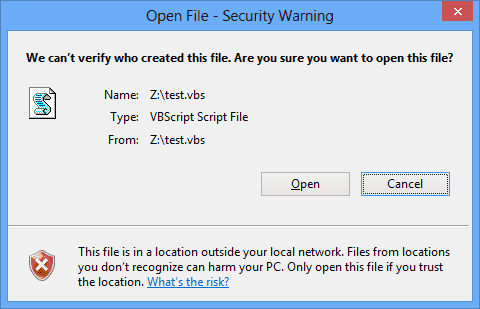
"We can’t verify who created this file" Message

Fix “We can’t verify who created this file” Error

Fix:  
I often launch .exe and .vbs files from network drives that are mapped to many different computers. Because of the security features built into Microsoft Windows, users may often receive an “Open File – Security Warning” dialog box that says “We can’t verify who created this file. Are you sure you want to open this file?” when opening files from locations other than the local computer. If you encounter this error often, and would like to save the extra step of clicking the Open button, you can setup the file location as a trusted site.

1. Open Control Panel, then go to Network and Internet > Internet Options.
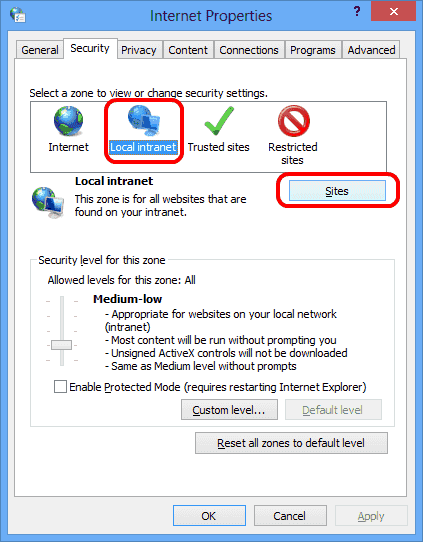
2. Select the Security tab.
3. Select Local intranet, then select the Sites button.
Local Intranet Sites Selection Internet Properties
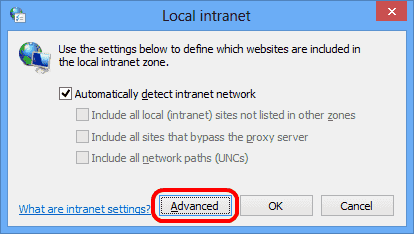
4. Choose the Advanced button on the Local intranet dialog box that appears.
Local Intranet Advanced Button
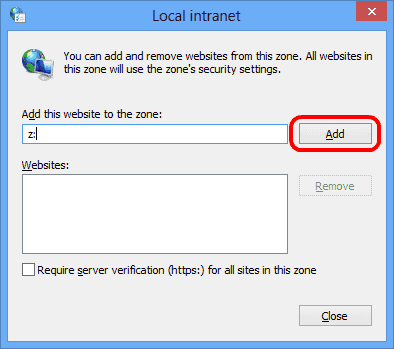
5. Type the location of the file that produces the warning. The path could be a mapped network drive or a UNC path like “\\Server1″. In this case, my test.vbs file was on the Z: drive. So I will type Z:, then press Add.
Add Local Intranet location
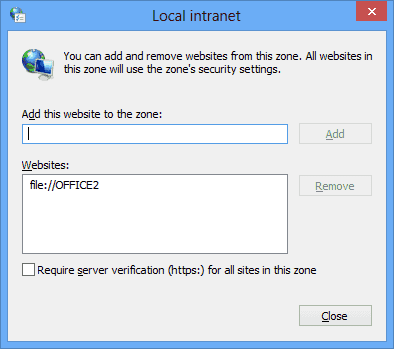
6. The path may change once it’s added to the Websites box. This is normal behavior.
Intranet Location Added
7. Click Close > OK > OK.
Now you should be able to open any file from that location without receiving the “We can’t verify who created this file” error.

It is now safe to turn off your computer

It is now safe to turn off your computer

In order to safely turn off your computer, you need to ensure that the motherboard permits the automatic shut down of the system. To get the display of this message on the Windows screen: "it is now safe to shut down your computer", one needs to edit the registry by opening the registry in the command prompt and typing 'regedit'. After typing the 'regedit' command in the command prompt and pressing Enter, the user needs to first go to the 'HKEY_LOCAL_MACHINE', then to 'SOFTWARE', and then to 'Microsoft', followed by 'Windows NT', 'CurrentVersion' and finally to 'Winlogon'. One needs to then create or edit a string value "PowerDownAfterShutdown" and reset the value as 1.
It is now safe to turn off your computer!


On Windows systems the message "It is now safe to turn off your computer" is displayed only if the motherboard and case permit it, to ensure that the system starts automatically switched off.

To do this, open the editor of the registry (Start / Run / regedit)

Position yourself on:

HKEY_LOCAL_MACHINE / SOFTWARE / Microsoft / Windows NT / CurrentVersion / Winlogon


Edit or create the string value "PowerDownAfterShutdown" and set its value to "1".