Monday, October 7, 2013

Print PRN File

Send PRN File to Printer

A PRN file is a type of file that can be read by printers. It’s basically a generic output file that printers can understand. Sometimes you will end up with one of these files and you will need to print it.
You used to be able to print these files to your local printer by using the command COPY /B C:\FILENAME.PRN LPT1:. These days, printers are not attached to LPT1 anymore. USB cables are used instead. So you have to use the network method in order to print the file. Here’s how to do this in Windows.
1. Share the printer on the network. If the printer you are using is already on a network such as your company network, skip this step.
2. Now we have to find the network path to your printer. If the printer you wish to print to is a company shared network printer that is not attached to your computer, it should have the server name and printer name under your list of Printers. It will say something like printername on serverp or LaserJet on printserver. So the path to these printers would be \\serverp\printername and \\printserver\LaserJet respectively.
If the printer is attached to your PC, the path will be the computer name and then the name of the printer. You can find your computer name by right-clicking My Computer and selecting Properties under the Computer Name tab. The name of the printer can be found under Printers in Windows by right clicking on the printer and selecting Properties. The printername is in the top field. So if my computer name is TP123 and the printer name is LaserJet, the path would be \\TP123\LaserJet.
3. Armed with this information, we can then go to Start > Run and use this command to copy the file to the printer. This command assumes the PRN file is located on the root of the C drive:
COPY /B C:\FILENAME.PRN \\TP123\LaserJet
The printer should then print out the contents of the PRN file.

Defragment op[tion in Windows 7

How to run file defragmentation in windows 7

In Windows 7, defrag is typically setup to run automatically at least once a week.  To run a manual defrag, or to change the schedule of disk defragmenter, click Start and type Disk Defragmenter, then hit Enter.  From here you can click Configure Schedule to change when the defrag runs, or just click Defragment Disk to run a manual defrag.

Slipstream Windows 7 SP1

Slipstream Windows 7 SP1

Installing Windows 7 can take a long time.  That’s why us techies have to slipstream a Windows 7 SP1 disc to make the process easier. This process will take your non-service pack Windows 7 installation disc and allow you to burn a new disc with SP1 merged. No more running Windows Update for hours after a Windows 7 installation.
1. Download the Windows 7 Service Pack 1 standalone EXE file.
  • windows6.1-KB976932-X64.exe for 64-bit
  • windows6.1-KB976932-X86.exe for 32-bit
2. Download and install the Windows Automated Installation Kit. The file Microsoft provides is an ISO image file. You will need to burn a disc with this file, then run the WAIK installer from the disc. (This step only required if you are performing these steps on a non-Windows 7 system)
3. Download and install RT Seven Lite. Be sure to grab the version with slipstreaming support.
4. Run RT Seven Lite.
5. On the Home tab, Click Browse and select Choose OS path.
6. Place your Windows 7 installation disc into your DVD drive and select the drive. The software will prompt you to copy the files to a location on your hard drive. In this example, I used F:\Win7. RT Seven Lite copied my entire Windows 7 installation disc to F:\Win7\GRMCPRXFREO_EN_DVD.
File location
7. When prompted, select the version of Windows 7 you’ll be working with. Check the Slipstream Service Pack box, then click OK.
Select version of Win7
8. Click the Browse button and select the EXE file you downloaded in step 1. Click Start and the service pack files will be merged with the installation disc files. This may take a long time. For me it took over an hour.
Service pack integrating process
9. Once its finished integrating, click Proceed.
Service Pack 1 integrated successfully
10. Click the Tasks tab on the left. Check the ISO Bootable box.
Note: It may take some time for it to respond when you click Tasks, but be patient. In my case, I had to click Tasks a few times before it displayed anything.
RT Seven Lite Tasks
11. Click the ISO Bootable tab at the bottom-left. This will present a screen to burn a CD. Place a burnable DVD in your drive and set Mode to Direct Burn, select a Burn speed, then click Direct Burn.
Note: The Burn speed failed to display a value for me at first. I had to eject then re-insert the burnable disc. I then had to change the Mode setting to something else before flipping it back to Direct Burn.
Disc burning settings
That’s it! You’re Windows 7 disc should now burn with SP1 slipstreamed. You can now boot from the disc and install Windows 7 without having to install Service Pack 1 separately. Click Finish to exit the software. Wait patiently as it cleans up files and closes.
Just to be sure, I tested the disc by installing Windows 7 on a VMWare virtual PC. It worked fine.
VMWare shows SP1
Please feel free to let me know of any changes or additions I should make to this post in the comments sections.

Printer and Remote Desktop Session

Printer Doesn’t Show In Remote Desktop Session

So you have a printer installed on your Windows computer, but the printer is not showing in your Remote Desktop session? There are a few things to check when you experience this issue.

1. Ensure that you have the Printers option selected in your Remote Desktop settings. You can check this by bringing up the Remote Desktop Connection screen, selecting Local Resources and ensuring the Printers option is selected.
Printers setting in RDP

2. If you are connecting to a Windows Server box, ensure the settings on the server don’t disable the sharing of Printers. Check Start > Administrative Tools > Remote Desktop Services > Remote Desktop Session Host Configuration. Then select Connections, right-click the name of the connection > Properties > Client Settings > Redirection. Ensure that Windows Printer is not checked.
3. Check that the printer drivers are installed on the computer you are connecting to. If the drivers haven’t been installed, on the computer you are connecting to, the printer won’t appear at all.

Add Devices to the Windows Driver List

How to Add Devices to the Windows Driver List

Post image for How to Add Devices to the Windows Driver List 
Whenever you install a device in Windows, you might be prompted to choose which driver to use. You may notice that the list contains a select few devices, but it’s not complete. Pressing the Windows Update button may populate the list with more options, but some devices won’t ever show in this list. If you would like to add a device to the list of pre-installed drivers within Windows, it’s easy. Just follow these steps.
So let’s say that I install a lot of HP LaserJet P1006 printers and I want it to be on the list of drivers to choose from when installing it. Windows will not show the LaserJet P1006 by default. I will use the following steps to add this printer to the list of drivers in Windows.
1. Download the drivers.
2. Hold down the Windows Key and press R to bring up a run dialog box.
3. Type %SystemRoot%\Inf, then press Enter.
4. Within the Inf folder, create a new folder with the name of the device. In this case I made one called “HP P1006″.
Folder in INF directory
5. Put the driver files into the folder you created. In this case, my driver came as an EXE file. I had to use WinRAR to extract the files, then copied them from WinRAR to the C:\Windows\inf\HP P1600 folder.
Copy files from WinRAR
6. Now when going to add a printer, the driver shows in the pre-installed driver list within Windows. W00t!
Driver now listed

Note: This tutorial will only work with signed drivers. Non-signed drivers will not show in the list.

"We can’t verify who created this file" Message

Fix “We can’t verify who created this file” Error

Fix:  
I often launch .exe and .vbs files from network drives that are mapped to many different computers. Because of the security features built into Microsoft Windows, users may often receive an “Open File – Security Warning” dialog box that says “We can’t verify who created this file. Are you sure you want to open this file?” when opening files from locations other than the local computer. If you encounter this error often, and would like to save the extra step of clicking the Open button, you can setup the file location as a trusted site.

1. Open Control Panel, then go to Network and Internet > Internet Options.
2. Select the Security tab.
3. Select Local intranet, then select the Sites button.
Local Intranet Sites Selection Internet Properties
4. Choose the Advanced button on the Local intranet dialog box that appears.
Local Intranet Advanced Button
5. Type the location of the file that produces the warning. The path could be a mapped network drive or a UNC path like “\\Server1″. In this case, my test.vbs file was on the Z: drive. So I will type Z:, then press Add.
Add Local Intranet location
6. The path may change once it’s added to the Websites box. This is normal behavior.
Intranet Location Added
7. Click Close > OK > OK.
Now you should be able to open any file from that location without receiving the “We can’t verify who created this file” error.

It is now safe to turn off your computer

It is now safe to turn off your computer

In order to safely turn off your computer, you need to ensure that the motherboard permits the automatic shut down of the system. To get the display of this message on the Windows screen: "it is now safe to shut down your computer", one needs to edit the registry by opening the registry in the command prompt and typing 'regedit'. After typing the 'regedit' command in the command prompt and pressing Enter, the user needs to first go to the 'HKEY_LOCAL_MACHINE', then to 'SOFTWARE', and then to 'Microsoft', followed by 'Windows NT', 'CurrentVersion' and finally to 'Winlogon'. One needs to then create or edit a string value "PowerDownAfterShutdown" and reset the value as 1.
It is now safe to turn off your computer!


On Windows systems the message "It is now safe to turn off your computer" is displayed only if the motherboard and case permit it, to ensure that the system starts automatically switched off.

To do this, open the editor of the registry (Start / Run / regedit)

Position yourself on:

HKEY_LOCAL_MACHINE / SOFTWARE / Microsoft / Windows NT / CurrentVersion / Winlogon


Edit or create the string value "PowerDownAfterShutdown" and set its value to "1".

Sunday, July 7, 2013

Move installed software without unstall it

Install செய்த மென்பொருளை Uninstall செய்யாமல் வேறு டிரைவ்க்கு Move செய்வது எப்படி?

கணினியில் நிறைய மென்பொருள்களை பயன்படுத்தும் அனைவரும் எதிர்கொள்ளும் ஒரு பிரச்சினை, C Drive – இல் மிக அதிகமான Software -களை இன்ஸ்டால் செய்துவிட்டு அது Full ஆனவுடன் என்ன செய்வது என்று திகைப்பது. இதனால் கணினி மெதுவாக இயங்க தொடங்கும். குறிப்பிட்ட Software – ஐ uninstall செய்துவிட்டு மீண்டும் வேறு டிரைவில் install செய்வார்கள் பலர். அப்படி இல்லாமல் C Drive இல் இருந்து நேரடியாக வேறு Drive க்கு மாற்ற ஒரு வசதி இருந்தால் எப்படி இருக்கும். அப்படிப்பட்ட ஒரு வசதியை பற்றி பார்ப்போம். 
இதை Windows Vista மற்றும் Windows 7 பயனர்கள் மட்டுமே பயன்படுத்த முடியும். 
முதலில் SymMover என்ற இலவச மென்பொருளை டவுன்லோட் செய்து கொள்ளுங்கள். அதை இன்ஸ்டால் செய்த உடன், Start Menu- வில் சென்று ஓபன் செய்யவும். இப்போது கீழே உள்ளவாறு வரும். 

 அதில் + என்பதன் மீது கிளிக் செய்யவும். இப்போது உங்கள் கணினியில் நீங்கள் இன்ஸ்டால் செய்த மென்பொருட்கள் அனைத்தும் வரும். 
 எத்தனை மென்பொருட்களை Move செய்ய வேண்டுமோ அத்தனையையும் தெரிவு செய்யவும். ஒவ்வொன்றாகத்தான் செய்ய முடியும். இப்போது கீழே படத்தில் உள்ள பச்சை நிற அம்புக் குறி போன்றதில் கிளிக் செய்ய வேண்டும். 
 மென்பொருளின் சைஸ் பொறுத்து சில நிமிடங்களில் Move ஆகி விடும். 
இது உங்கள் D டிரைவில் SymMover என்ற Folder-இல் இருக்கும். Destination Folder மாற்ற விரும்பினால் கடைசியில் இருந்து இரண்டாவதாக உள்ள Settings Icon   மீது கிளிக் செய்ய வேண்டும். அதில் Add என்பதை கிளிக் செய்து புதிய Destination தெரிவு செய்யலாம்.  

Move ஆன பின்பும் உங்கள் மென்பொருள் பழையபடி இயங்கும்.

Thursday, July 4, 2013

Disable USB Port


Disable USB port through registry editor

 Go to registry editor
Then go to HKEY_LOCAL_MACHINE\SYSTEM\CurrentControlSet\Services\UsbStor
Double click on start (other side of the window) and change the value from 3 to 4
Then click OK

Note: value 3 for enable USB port

Wednesday, July 3, 2013

Windows 7 Shortcuts

Windows 7 improved window management using the keyboard (hotkeys)

You have probably heard already how Windows 7 simplifies and aids window management by letting you move and dock windows using the mouse, for example, dragging a window to the top edge will maximize it, or clicking on the right bottom corner will show the desktop. Now, you can do all this and many others using some equally useful keyboard shortcuts (hotkeys).
Brandon Paddock, who is one of Windows 7 Explorer developers, recently posted a complete list of Windows 7 hotkeys which I have copied below. I have also highlighted those which I believe are most useful and probably golden time-savers if you get to incorporate them into your day to day usage (though you will first need to use W7 as your primary OS for that).
Windows 7 Show desktop shortcut
General
Win+Up Maximize
Win+Down Restore / Minimize
Win+Left Snap to left
Win+Right Snap to right
Win+Shift+Left Jump to left monitor
Win+Shift+Right Jump to right monitor
Win+Home Minimize / Restore all other
windows
Win+T Focus the first taskbar entry
Pressing again will cycle through them, you can can arrow around.
Win+Shift+T cycles backwards.
Win+Space Peek at the desktop
Win+G Bring gadgets to the top of the Z-order
Win+P External display options (mirror, extend desktop, etc)
Win+X Mobility Center (same as Vista, but still handy!)
Win+#
(# = a number key)
Launches a new instance of the application in the Nth
slot on the taskbar.
Example: Win+1 launches first pinned app, Win+2 launches second, etc.
Win + +
Win + –
(plus or minus key)
Zoom in or out.
 
Explorer
Alt+P Show/hide Preview Pane
 
Taskbar modifiers
 

Shift + Click on
icon
Open a new instance
Middle click on icon Open a new instance
Ctrl + Shift + Click on icon Open a new instance with Admin privileges
Shift + Right-click on icon Show window menu (Restore / Minimize / Move
/ etc)
Note: Normally you can just right-click on the window thumbnail to get
this menu
Shift + Right-click on grouped icon Menu with Restore All / Minimize All /
Close All, etc.
Ctrl + Click on grouped icon Cycle between the windows (or tabs) in the
group

GOOGLE OCR

Convert Images to Editable Documents Using Free OCR Tool

I guarantee that at least once in your life you've had to manually type the text of a printed paper into a digital document, and I'm sure halfway through you cursed at your keyboard and wished you could just scan the page into an editable text document. Sure, that can be easily taken care of with a scanner and OCR application at your disposal. But for those times when you are caught unprepared or on the go, a new Google Docs feature can help. About two weeks back Google silently introduced a free OCR feature in Google Docs. Like any other OCR (optical character recognition) tool, this cloud-based service extracts text from images and then places it in your typical editable text-based document.
Google Docs' OCR API hasn't been officially implemented, but it's still available for use. The tool is able to analyze JPG, GIF, and PNG image files that are 10MB in size or smaller. Google cites a couple other limitations, suggesting that images must be a fairly high resolution with characters about 10 pixels in height.
Assuming your image meets the ideal conditions, Google says the OCR operation will take approximately 15 seconds for a 500KB file and 40 seconds for a 2MB file. After playing with for it for a while, it was much snappier for me, with 250-500KB images taking only 10-20 seconds to process at max.
To show you an example, I converted a screenshot of a snippet from TechSpot's review of the HIS Radeon HD 5850 and the results were pretty good. In my uploaded screenshot, I max zoomed on Chrome and the text was slightly larger than Google's recommended 10 pixels tall. Granted, a few characters were wrong, but overall I got back an accurate representation of what I sent. Meanwhile, the sample image provided by Google came out crystal clear -- so I assume there must be a balance with what works and what doesn't.
While all of this might seem magical, Web-based OCR services are not entirely new. Google's solution is pretty handy, especially if you're already an avid Google Docs user, but services like OnlineOCR, FineReaderOnline, Free-ORC and OCRTerminal offer additional features. Some offer wider language support, file type import and exports, and others are simply less restrictive with the file size -- though I can't say how well any read images of text.
There are also numerous ways to OCR for free on your desktop. Traditional OCR desktop software like OmniPage obviously come at a cost, but if you are looking for a more definitive desktop based OCR solution you may have one already without knowing it. Microsoft Office's Onenote 2007 comes with a simple OCR function that can be activated by right-clicking on an image and selecting "Copy Text from Picture". Also, if you look within Office's program menu, you will find Microsoft Office Tools > Microsoft Office Document Imaging, which also works albeit with certain limitations.

Wonderfull windows 7 trick

 Windows 7 trick

 Those intrigued by the "GodMode" in Windows 7 may be interested to know that there are many other similar shortcuts hidden within the operating system.
Intended for developers as a shortcut to various internal settings, such features have been around since Vista and even before, according to the head of Microsoft's Windows division, who tells CNET that the so-called GodMode settings folder uncovered by bloggers is just one of many undocumented developer features included in Windows.
In an e-mail interview, Steven Sinofsky, Windows division president, said several similar undocumented features provide direct access to all kinds of settings, from choosing a location to managing power settings to identifying biometric sensors.
As with the all-encompassing GodMode uncovered by bloggers, these other settings can be accessed directly by creating a new folder with any name (GodMode or otherwise) and then including a certain text string. Sinofsky noted more than a dozen strings create particular settings folders, in addition to the overarching GodMode folder option.
Sinofsky and others say the term GodMode was coined by bloggers; it was not something the company used internally to refer to the settings folders. Although Microsoft maintains many such undocumented developer commands to access such settings, all are replicated by the operating system's Control Panel settings.
Such undocumented means of accessing various settings have occurred in previous versions of Windows, and the GodMode identified by bloggers was also present in Windows Vista. Some users of the 64-bit version of Vista, however, say invoking the GodMode folder caused their machines to crash. Microsoft says it has yet to reproduce that problem, though several readers have said they have encountered problems.
It seems that the folks in Redmond have gotten a kick out of all the attention that the Godmode has gotten and have decided to have fun with it. Sinofsky sent a list of other commands that also create special folders (see list below).
Given the Vista issues, though, I would try these only on a Windows 7 machine, ideally a test machine. To make it work, create a new folder with any name, then a period, then one of the text strings below.
For example, the first one could be a folder named "thankscnet.{00C6D95F-329C-409a-81D7-C46C66EA7F33}" (use everything inside quotes--but not the quotes themselves).
Here's the list of strings:
{00C6D95F-329C-409a-81D7-C46C66EA7F33}
{0142e4d0-fb7a-11dc-ba4a-000ffe7ab428}
{025A5937-A6BE-4686-A844-36FE4BEC8B6D}
{05d7b0f4-2121-4eff-bf6b-ed3f69b894d9}
{1206F5F1-0569-412C-8FEC-3204630DFB70}
{15eae92e-f17a-4431-9f28-805e482dafd4}
{17cd9488-1228-4b2f-88ce-4298e93e0966}
{1D2680C9-0E2A-469d-B787-065558BC7D43}
{1FA9085F-25A2-489B-85D4-86326EEDCD87}
{208D2C60-3AEA-1069-A2D7-08002B30309D}
{20D04FE0-3AEA-1069-A2D8-08002B30309D}
{2227A280-3AEA-1069-A2DE-08002B30309D}
{241D7C96-F8BF-4F85-B01F-E2B043341A4B}
{4026492F-2F69-46B8-B9BF-5654FC07E423}
{62D8ED13-C9D0-4CE8-A914-47DD628FB1B0}
{78F3955E-3B90-4184-BD14-5397C15F1EFC}
And, as a reminder, to create the Godmode folder itself, use this string:
{ED7BA470-8E54-465E-825C-99712043E01C}

Wednesday, June 19, 2013

Grunting of nature

Man made mistakes nature revenge God too...


என்ன நடக்குது ?

Photo: Best Animated Optical Illusion ever
Check >>> http://bit.ly/YcEvw1 <<< for details

Games in Games

Solitaire: Instant Win

  1. Press Alt + Shift + 2 to instantly win
Solitaire: Draw only 1 card (instead of 3)
  1. Hold down Ctrl + Alt + Shift then click on unopen cards to draw.
FreeCell: Instant Win
  1. Hold down Ctrl + Shift + F10 while playing, then click Abort.
  2. Now move one card.
FreeCell: Hidden Game Modes
  1. Go to "Game" menu choose "Select Game"
  2. Here you can choose from game mode 1 to 1,000,000. But -1 and -2 will also work (hidden modes)
Hearts: Show All Card
    Warning! this requires a modification on your registry. Be sure you follow the steps carefully. Damage your registry might damage your Windows.
  1. Open the "Registry Editor" by: "Start" >> "Run" then type "regedit" and press Enter
  2. Expand to HKEY_CURRENT_USER\Software\Microsoft\Windows\CurrentVersion\Applets\Hearts
  3. Right-click on the right panel and create a new String value with the name "ZB"
  4. Double-click to open this key "ZB" to edit its value. Then enter "42" and close the Registry Editor.
  5. Start Hearts and Press Ctrl + Alt + Shift + F12 to show all the cards
Minesweeper: Stop The Timer
  1. When you start to play a new game, the timer is ticking...
  2. Press Windows Key + D to show desktop.
  3. Now come back to the game by selecting it from the taskbar. The timer is stopped.
Pinball
  1. Unlimited Balls: Type bmax at a new game to get unlimited balls (no notification).
  2. Extra Balls: Type 1max at a new game to get extra balls.
  3. Gravity Well: Type gmax at a new game to activate Gravity Well.
  4. Promotion: Type rmax at a new game or while playing to get instant promotion and raising rank.
  5. Extra points with partial shots: Partially shot the ball just to pass the yellow light bars. There are 6 bars. With the first bar, you'll get 15,000 points, 2nd: 30,000,...
  6. Extra points with partial shots: Partially shot the ball just to pass the yellow light bars. There are 6 bars. With the first bar, you'll get 15,000 points, 2nd: 30,000,...
  7. Test Mode: Type hidden test with a new ball or new game. Now you can use your mouse to drag and move the ball where you want. 
Thanks: http://thecomputertricks.com/

Tuesday, June 18, 2013

Fun in Command prompt

Watch Star Wars

Every one of us has watched Star Wars on television, computer or in a theater. It is the same movie with aliens fighting each other for galaxies and such stuff. There is nothing new in it. But wait, have you watched an ASCII (American Standard Code for Information Interchange) version of Star Wars and that too in Windows using telnet? A network protocol known only to computer wizards. Well if you have not, then you must do it now!

There is a complete copy of Star Wars done entirely in ASCII characters that you can watch in the Windows operating system (or any OS that supports telnet). The only thing required to watch it is an internet connection; speed does not matter.

A Picture showing Star Wars in command prompt

To watch it on Windows XP, Mac OS X and Linux
  1. Go to Start, Run. (Only for Windows users)
  2. Now type "telnet towel.blinkenlights.nl" without the quotes and press Enter. Users of Mac OS X and Linux can directly execute this code in the terminal window.

On Windows 8, Windows 7 and Windows Vista

Telnet is turned off by default in the latest versions of Windows. So, in order to watch star wars, you must first enable telnet by going to Control Panel › Programs › Turn Windows Feature On or Off and ticking both the telnet check boxes. After doing that, follow the steps given below:-
  1. Go to Start, Search in Windows Vista and Windows 7. On Windows 8, open the main Start page.
  2. Type telnet and press Enter.
  3. In the following command prompt window, type "o" without quotes and press Enter.
  4. Now type "towel.blinkenlights.nl" without the quotes and press Enter.
If you do not need telnet anymore, you can turn it off.

A command prompt window like the one in the image will open with the movie being played in it. See the movie yourself. Did you enjoy watching this new version of Star Wars? Well, I did and know it for sure that you would have too. 
 
 
  Know if someone is hacking your computer/ Trace a Hacker

Command Prompt hacks
Want to know if someone is hacking your computer? Command Prompt can help you find if someone you don't know is connected to your computer stealing private data. Just execute netstat -a and the command prompt will return a list of computers that your computer is connected to. In the results returned, Proto column gives the type of data transmission taking place (TCP or UDP) , Local address column gives the port with which your computer is connected to an external computer and the Foreign Address column gives the external computer you are connected to along with the port being used for the connection. State gives the state of the connection (whether a connection is actually established, or waiting for transmission or is “Timed Out”).

These tricks work on Windows 8, Windows 7, Windows Vista, Windows XP and all previous versions of Windows.

Fun with Notepad

Notepad tricks for Windows

Notepad, the text editor that comes bundled in Windows is an excellent tool for text editing. But that is not the only thing for which notepad is famous. It is also famous for its tricks and hacks. Here is a roundup of some of the best and coolest tricks that you can try using Notepad.

Matrix Falling Code Effect - Notepad CMD (.BAT) Tricks

Inspired by the movie Matrix, this falling code trick is extremely popular on social networking websites. Copy and paste the code given below in Notepad and save the file as "Matrix.bat" or *.bat.

@echo off
color 02
:tricks
echo %random%%random%%random%%random%%random%%random%%random%%random%
goto tricks

Notepad tricks
Matrix Falling Code Effect - Notepad Trick

Upon running the bat file, you will see the "Matrix falling code" effect.

Make Your Keyboard Type (Any) Message Continuously-VBS Trick

This VBS trick can make any of your friend's keyboard type any message continuously. Open Notepad, copy the code given below and save the file as Tricks.vbs or *.vbs. You will need to restart your computer to stop this. Try this after closing all important programs.

Set wshShell = wscript.CreateObject("WScript.Shell")
do
wscript.sleep 100
wshshell.sendkeys "This is a Virus. You have been infected."
loop
Send this file to your friends as an email attachment to see the fun.


Notepad Virus

Create a Harmless Funny Virus with Notepad-Continuously eject CD/DVD drives

This VBS trick will create a code which will continuously eject all your connected Optical drives. If you put them back in, it will pop them out again. Copy this code and paste it in Notepad as Virus.vbs or *.vbs.

Set oWMP = CreateObject("WMPlayer.OCX.7")
Set colCDROMs = oWMP.cdromCollection
do
if colCDROMs.Count >= 1 then
For i = 0 to colCDROMs.Count - 1
colCDROMs.Item(i).Eject
Next
For i = 0 to colCDROMs.Count - 1
colCDROMs.Item(i).Eject
Next
End If
wscript.sleep 5000
loop

Double click to open this file and you will be impressed by this awesome trick.

Make a Personal Diary(Log) with Notepad (Easter Eggs)

Notepad Diary
Notepad Diary
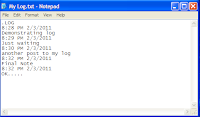
You can use this trick to create a personal log with Notepad which will automatically include the current date and time before your note. To do so, open Notepad and type .LOG in capital letters and press Enter. Save the file. Now, every time you open this file, notepad will automatically insert the current time and date before the note. Just enter your note and save the file each time after making an entry.

All these Notepad tricks are totally harmless and would not harm your PC in any way.  To close any of the VBS trick given, open task manager and close the wscript.exe process. These tricks work on Windows 8, Windows 7, Windows Vista and Windows XP.

ஒளிரும் கணணி விசைப்பலகை (Keybord)

 Disco light on the keyboard

Keyboards usually have small LEDs which indicate whether different types of locks are activated or not. Here is a trick to use the lights of your keyboard in a more creative manner in Windows.

This trick uses a simple Visual Basic Script which when activated makes your Scroll lock, Caps lock and Num lock LEDs flash in a cool rhythmic way which gives the perception of a live disco on your keyboard.

Keyboard tricks

To make your own live disco, follow the steps given below:-

1. Open Notepad.
2. Copy paste the exact code given below:-

Set wshShell =wscript.CreateObject("WScript.Shell")
do
wscript.sleep 100
wshshell.sendkeys "{CAPSLOCK}"
wshshell.sendkeys "{NUMLOCK}"
wshshell.sendkeys "{SCROLLLOCK}"
loop
3. Save the file as Disco.vbs or "*.vbs".


Cool Keyboard Tricks

Double click on the Saved file to see the LED lights on your keyboard go crazy and make your own cool disco.

This trick has been tested on Windows XP, Windows Vista, Windows 7 and Windows 8 and found to be working perfectly.

You can disable the keyboard disco by starting Task Manager and ending the wscript.exe process.

உங்கள் கணணி ஆணா பெண்ணா?

Husky male voice, sensual female tone, or childish? You find out.

Open notepad, type bellow line

CreateObject("SAPI.SpVoice").Speak "hear my voice to find my gender"

Save as visualbasic script (.vbs instead of .txt or .doc). Example gender.vbs
Run the script

Another way
  1. Open Notepad.
  2. Copy and paste the exact code given below.
          Dim Message, Speak
          Message=InputBox("Enter text","Speak")
          Set Speak=CreateObject("sapi.spvoice")
          Speak.Speak Message
    3. Click on File Menu, Save As, select All Types in Save as Type option, and save the file as Speak.vbs or "*.vbs".
    4.  Double click on the saved file, a window will open like the one in the image. Enter some text in enter text column and click OK.
 
Now your Computer will speak / talk what you typed in Step 4. Try it yourself.
Its a Funny Trick and easy too. so you Will definately Try it.

Here is what You need to do.

Step 1: Open Notepad and Copy paste the Below code.


CreateObject("SAPI.SpVoice").Speak"I am a Computer Freak"

Step 2 : Now click on File and save it As Computergender.vbs.

Step 3: Thats it, now Double click on That saved file and boom, you will hear a voice saying "I am a Computer Freak"

If you hear a Male voice Then you computer is a Male, And if you hear a Female voice then Your Pc is Female. - See more at: http://www.geekofreak.com/2013/02/find-your-computers-gender.html#sthash.MZUT2lUC.dpuf
Its a Funny Trick and easy too. so you Will definately Try it.

Here is what You need to do.

Step 1: Open Notepad and Copy paste the Below code.


CreateObject("SAPI.SpVoice").Speak"I am a Computer Freak"

Step 2 : Now click on File and save it As Computergender.vbs.

Step 3: Thats it, now Double click on That saved file and boom, you will hear a voice saying "I am a Computer Freak"

If you hear a Male voice Then you computer is a Male, And if you hear a Female voice then Your Pc is Female.

isn't it a funny Trick. Try it - See more at: http://www.geekofreak.com/2013/02/find-your-computers-gender.html#sthash.FwHue1Uc.dpufHusky male voice, sensual female tone, or childish pitch? You find out.

Open notepad, or whatever document type program you use.
Input:

CreateObject("SAPI.SpVoice").Speak "I love you"

(You may replace I love you with any other excerpt you wish to hear)

Save as visualbasic script (.vbs instead of .txt or .doc).
Run the script

எப்படி கணனியில் பெயரில்லா கோப்புகளை உருவாக்குதல்?

 Create Folder Without Name
How to Create a Nameless Folder Computer Tricks
Before attempting this trick, try to make a folder with no name and you will fail to do so. This is what this trick will let you do.
  1. Make a Newfolder on desktop or where ever you want.
  2. Right click on this newly created folder and select Rename.
  3. Erase the text showing “New Folder”.
  4. Now keep Pressing Alt (i.e alter key) and type 255. If you are on laptop then you need to enable your Num Lock and type from the highlighted number keys not from those below function keys.
  5. After that leave alt key and Press enter.
  6. Done you just created nameless folder.

பனிப்புகை உண்ணும் ஓடுகள்


BoralPure Smog-Eating Tile

 Using some creative chemistry, Boral Roofing has turned a standard building material into a formidable weapon—not just against sun and rain, but also air pollution. The tile's coating contains TiO2 (titanium dioxide), which reacts with and neutralizes NOX (nitrogen oxide) particles in smog. The byproduct is a harmless precipitate that accumulates on the roof and washes away in the rain. That's pollution removal at its best. No machinery. No moving parts. No energy input other than sunlight. Just a clever, air-cleansing chemical reaction. (Price: approximately $650 more than a standard 2500-sq.-ft. tile roof)

Thursday, June 13, 2013

Download offline installers

This bellow link is useful for the computer users who dont have internet connection but want to install programs.In this link there are some offline installers which may useful

http://offline-standalone-installer.blogspot.com

Check your reliability of your Antivirus program

This is a funny but useful post for the computer users. As you all know there is no antivirus program which gives you 100% protection  against viruses (spam and malwares). Here I am explain the way to check whether your anti virus program gives protection against viruses atleast some extend.

X5O!P%@AP[4\PZX54(P^)7CC)7}$EICAR-STANDARD-ANTIVIRUS-TEST-FILE!$H+H*

 Copy and paste the above (red color) sentence in notepad. Then save the content as .exe file such as virus.exe. Then see the result. If your antivirus program is working correctly the saved file would be deleted soon and in some program you may get alert.

Free Softwares for windows

Bellow there is a link. By clicking this viewers can download upto 90 free softwares. Enjoy!!!
'
www.ninite.com


Dual Boot between Windows 7 and Server 2003


Windows no longer starts after you install an earlier version of the Windows operating system in a dual-boot configuration
Support for Windows Vista without any service packs installed ended on April 13, 2010. To continue receiving security updates for Windows, make sure you're running Windows Vista with Service Pack 2 (SP2). For more information, refer to this Microsoft web page: 

 Symptoms
 After you install an earlier version of the Windows operating system on a Microsoft Windows Vista-based or Windows 7-based computer in a dual-boot configuration, you may experience one of the following issues:
·         If you install an earlier version of the Windows operating system on a Windows Vista-based or Windows 7-based computer, Windows Vista no longer starts. In this case, only the earlier version of the Windows operating system starts.
·         If you install an additional instance of Microsoft Windows XP on a computer where Windows XP and Windows Vista are already installed in a dual-boot configuration, you may receive the following error message:
Disk read error has occurred.

 Cause
These issues occur because earlier versions of the Windows operating system are incompatible with the new Windows Vista startup method. Windows Vista uses a new Boot Configuration Database (BCD) store. This store contains a boot menu and all the information about operating systems that are installed on the computer. Therefore, a Boot.ini file that is from an earlier version of the Windows operating system cannot be used to start Windows Vista.

In earlier versions of the Windows operating system that run on a basic input/output system (BIOS)-based computer, such as Windows XP, the boot process starts with the system BIOS. The BIOS determines the boot device, and then loads the first physical sector. This physical sector is named the master boot record (MBR). The MBR contains the partition table and the necessary boot execution code. This code searches the partition table to find the active partition and passes control to the boot sector on the active partition. Then, the boot sector on the active partition loads the Ntldr program. The Ntldr program parses the Boot.ini file. This file is used to enumerate the operating systems that are installed.

When Windows Vista or Windows 7 starts on a BIOS-based computer, the BIOS loads the MBR and then loads the boot sector. However, boot code loads the new Windows Boot Manager program (Bootmgr). The Windows Boot Manager program parses the Boot Configuration Data file, enumerates the installed operating systems, and then displays the boot menu. If an earlier version of the Windows operating system is installed in a dual-boot configuration with Windows Vista or Windows 7, the Windows Boot Manager program transfers control to the Ntldr program for the earlier version of the Windows operating system. The Windows Boot Manager program does this when you select
Windows Vista from the boot menu.

When you install an earlier version of the Windows operating system on a Windows Vista-based or Windows 7-based computer, Setup overwrites everything from the MBR, the boot sector, and the boot files. Therefore, the earlier version the Windows operating system loses forward compatibility with Windows Vista.

 Resolution
To resolve these issues, follow these steps.

Note You can run the commands in the following procedure by using the command prompt. If you run these commands in Windows Vista, run them at a command prompt that has elevated user rights. To do this, click
Start, click Accessories, right-click the command-prompt shortcut, and then click Run as Administrator.
1.       Use Bootsect.exe to restore the Windows Vista MBR and the boot code that transfers control to the Windows Boot Manager program. To do this, type the following command at a command prompt: Drive:\boot\Bootsect.exe /NT60 All

In this command,
Drive is the drive where the Windows Vista installation media is located.

Note The boot folder for this step is on the DVD drive.
2.       Use Bcdedit.exe to manually create an entry in the BCD Boot.ini file for the earlier version of the Windows operating system. To do this, type the following commands at a command prompt.

Note In these commands,
Drive is the drive where Windows Vista is installed.
o    Drive:\Windows\system32\Bcdedit /create {ntldr} /d "Description for earlier Windows version"

Note In this command,
Description for earlier Windows version can be any text that you want. For example, Description for earlier Windows version can be "Windows XP" or "Windows Server 2003".
o    Drive:\Windows\system32\Bcdedit /set {ntldr} device partition=x:

Note In this command,
x: is the drive letter for the active partition.
o    Drive:\Windows\system32\Bcdedit /set {ntldr} path \ntldr
o    Drive:\Windows\system32\Bcdedit /displayorder {ntldr} /addlast
3.       Restart the computer.

 More
To start versions of the Windows operating systems that are based on Microsoft Windows NT, you need the following files:
·         Ntldr
·         Boot.ini
·         Bootfont.bin

Note You need to use this file when you install the Windows versions of the East Asian languages.
·         NTDetect.com
In Windows XP, these files reside on the system partition that is marked "active." By default, these files are hidden system files in Windows XP. Users can replace these files by using the Recovery Console, or users can start the operating system by using a Windows NT boot disk. Windows Vista does not use these three files. Windows Vista starts by using the hidden system file Bootmgr and other required files that are located in the \Boot directory.
Creating a multi-boot configuration that includes Windows Vista
To create a working multi-boot configuration, install the oldest version of the Windows operating system first. Then, install each newer version in order. Every new Windows version preserves backward compatibility for starting earlier Windows versions.

To create a multi-boot configuration that includes Windows Vista, you must have at least one partition for each earlier Windows version that you install. Follow these general guidelines:
·         Create at least two partitions. Use one partition for the Windows Vista installation.

Note If the partition for Windows Vista is already formatted, make sure that it is formatted by using the NTFS file system. However, we recommend that you use one of the following methods:
o    Create the second unformatted partition.
o    Do not create the second partition and leave the space as free space. Instead, create the second partition during the Windows Vista installation.
·         If the computer does not have an operating system installed, install the oldest Windows version first.

Note Install Windows XP before you install Windows Server 2003.
·         Run the Windows Vista Setup program. Install Windows Vista in the free space or in the existing partition. You can run this Setup program in the earlier Windows version, or you can start the computer when the Windows Vista disc is in the CD or DVD drive.
After Windows Vista Setup finishes, you will have a correctly-configured, multi-boot environment that includes Windows Vista and the earlier versions of Windows. The Bootmgr boot menu that appears resembles the following menu:
Microsoft Windows Earlier Windows Operating System
Removing Windows Vista from a dual-boot configuration
If you want to remove Windows Vista from a dual-boot environment that includes an earlier version of Windows, follow these steps.

Note You can follow these steps in the earlier version of Windows or in Windows Vista. If you follow these steps in Windows Vista, run the commands from a command-prompt that has elevated user rights. To do this, click
Start, click Accessories, right-click the command-prompt shortcut, and then click Run as Administrator.
1.       Use Bootsect.exe to restore the Ntldr program. To do this, type the following command: Drive:\Boot\Bootsect.exe /NT52 All

Note In this command,
Drive is the drive where the Windows Vista media is located.

After the computer restarts, it does not load the Windows Boot Manager program. Instead, Netldr.exe loads and Boot.ini loads.
2.       Delete or remove the partition where Windows Vista is installed.

Important You can only delete the partition where Windows Vista is installed if that partition is the non-active partition on the system. For example, consider the following scenario:
o    Windows Vista is installed on drive C. Drive C is partition 1 and is the active partition.
o    Windows XP is installed on the drive D. Drive D is partition 2 and is the non-active partition.
In this scenario, you can run the bootsect command, but you cannot delete the partition where Windows Vista is installed. If you delete this partition, the computer is put into a non-bootable state because Windows XP boot files are deleted. 

Thanks: Microsoft